Best nymph rig for freestone streams
Feeling overwhelmed by the sheer variety of nymphing rigs out there when you're staring down a fast-flowing, rocky BC freestone stream? You're not alone! It can feel like a guessing game trying to figure out the perfect setup to get your flies down to those hungry trout and steelhead holding in the turbulent currents. This guide is going to strip away the confusion and walk you through building the best nymph rig for consistent success in British Columbia's dynamic freestone waters.
Understanding Freestone Streams and Their Unique Challenges
British Columbia is blessed with an incredible network of freestone streams, from the smallest creeks tumbling off the Coast Mountains to mighty rivers like the Thompson and Bulkley. These aren't your gentle, meandering spring creeks; they're characterized by their reliance on snowmelt and rainfall, leading to fluctuating water levels, powerful currents, and bottoms paved with cobble, gravel, and boulders. This dynamic environment presents both challenges and incredible opportunities for the nymph angler.
Characteristics of BC Freestone Rivers
When we talk about a "freestone" stream, we're generally referring to a river or creek that isn't spring-fed and doesn't flow out of a large lake that acts as a temperature and flow regulator. Instead, their water levels and temperatures can change rapidly with weather patterns, snowmelt, and rain. You might find crystal clear, low flows in late summer, or roaring, murky torrents after a heavy rain or during peak spring runoff. The bottom structure is often varied and rugged, full of large rocks, gravel bars, and sudden drops, creating a complex mosaic of riffles, runs, pockets, and deep pools. These features define where fish hold and how you need to present your flies.
Navigating these conditions requires a versatile approach. What works perfectly on a calm, consistent spring creek will often fail miserably when faced with the push and pull of a freestone river. The trout and steelhead in these waters are often strong, aggressive, and perfectly adapted to feeding in turbulent water, making them a thrilling catch. However, getting your fly to them effectively demands understanding the physics of the current and how fish relate to the varied bottom structure.
Why Nymphing Excels in These Environments
Nymphing is, hands down, one of the most effective ways to catch fish in freestone streams. Why? Because the vast majority of a trout's or steelhead's diet, especially in moving water, consists of subsurface insects. Mayfly nymphs, caddis larvae, stonefly nymphs, scuds, and various other aquatic invertebrates cling to the river bottom, get dislodged, and drift through the water column, becoming easy prey. Fish in these rivers spend most of their time looking down, feeding on this abundant drift.
Dry fly fishing is certainly exciting, and streamer fishing can be productive, but nymphing allows you to consistently present an imitation of this primary food source right in the fish's feeding lane, at the appropriate depth and speed. It’s a highly adaptable technique that can be modified to suit everything from shallow riffles to deep, fast runs. Whether you're targeting resident rainbow trout, feisty cutthroat, or migratory steelhead, a well-executed nymph rig is your best friend for connecting with fish in British Columbia's freestone gems. For more on catching these elusive fish, you might want to read our guide on How to Catch Steelhead in BC.
Essential Components of a Nymph Rig for BC Freestone Streams
Building a successful nymph rig isn't about one magic bullet; it's about assembling a system where each component works in harmony to deliver your flies effectively. From your rod to your flies, every choice matters when battling the currents of a BC freestone stream.
Fly Rod and Reel Selection
Your rod is your primary tool, and for nymphing freestone streams, a slightly longer rod with a medium-fast action is often ideal. Many anglers prefer a 9 to 10-foot rod in a 5 or 6-weight. The extra length gives you better line control, allowing you to mend your line more effectively, keep your fly line off the water for longer, and reach across complex currents. A medium-fast action offers enough backbone to fight powerful fish and cast weighted rigs, while still having enough sensitivity to detect subtle takes. For specialized techniques like Euro Nymphing, even longer and lighter rods (10 to 11 feet, 2 to 4-weight) are common, offering unparalleled sensitivity and control.
Your reel needs to be a reliable workhorse, capable of holding your line and backing, and possessing a smooth, consistent drag system. While you won't be "fighting" fish off the reel as much as with dry fly fishing, when a large steelhead or bull trout decides to run, a good drag is critical. Match the reel to your rod weight for balance; an unbalanced setup will lead to fatigue and poor casting. You don't need the most expensive reel on the market, but a reputable brand with a sealed drag system is always a good investment for wet conditions.
Fly Line and Leader Setup
For traditional indicator nymphing, a weight-forward floating fly line that matches your rod weight is standard. The weight-forward taper helps punch through the wind and turn over heavier nymph rigs. Colour choice is often a personal preference, though some anglers prefer brighter lines for better visibility and easier mending.
The leader system is where things get a bit more nuanced. A standard knotless tapered leader (7.5 to 9 feet, 3X to 5X) can be a starting point. However, many experienced nymph anglers in BC prefer to build their own leaders or modify commercial ones for better performance in freestone waters.
Here's a common modified approach:
- Butt Section: Start with 3-4 feet of heavy monofilament (20-30 lb test) or braided leader material connected to your fly line. This provides a strong, stiff foundation.
- Mid-Section: Add 2-3 feet of slightly lighter mono (10-15 lb test).
- Indicator Leader: Some anglers will then add a section of specialized indicator leader material, which is often bi-coloured for enhanced visibility, before attaching their tippet.
- Tippet: This is the crucial connection to your flies. You'll typically use fluorocarbon tippet, known for its low visibility in water and its abrasion resistance against rocky bottoms. Carry spools of 3X (for larger flies, heavier fish like steelhead, or murky water), 4X (all-around nymphing), and 5X (for smaller flies and clear, low water). For larger fish like those found in Best Steelhead Rivers in BC, don't be afraid to go with heavier tippet. You can find quality fluorocarbon tippet from brands like Seaguar or Rio, easily available on platforms like Amazon.
The goal of this leader system is to have a strong, visible connection to your indicator, with a nearly invisible, strong, and abrasion-resistant connection to your flies.
Indicator Choices
The indicator is your "bobber" for nymphing, signaling strikes and helping you track your drift. However, it's far more sensitive than a traditional bobber. There are several types, and each has its place:
- Pinch-on Indicators (e.g., Thingamabobber, Air-Lock Strike Indicators): These are buoyant, easy to adjust, and come in bright colours. They are excellent for traditional indicator nymphing where you need to suspend significant weight or fish deeper water. Brands like Air-Lock are widely available and well-regarded for their durability.
- Yarn/Wool Indicators: Highly sensitive and less prone to splashing, these are great for subtle takes or when fishing shallower, clearer water where a large plastic indicator might spook fish. They can be treated with floatant for extra buoyancy.
- Poly-Leaders/Sighter Material: Often used in Euro Nymphing, these aren't traditional "indicators" but brightly coloured sections of monofilament or braided line integrated into the leader. They allow for direct contact and extreme sensitivity, requiring you to visually track the line for the slightest pause, twitch, or change in drift. This technique is detailed further in guides like Euro Nymphing BC Interior Streams.
- Dry-Dropper Setups: Here, a buoyant dry fly acts as your indicator, suspending a nymph below it. This is a fantastic option when fish might be looking up occasionally, or when you're fishing shallower runs where a traditional indicator might be overkill.
Choosing the right indicator depends on water conditions, depth, current speed, and your personal preference. Keep a variety in your vest.
Weighting Your Rig
Getting your nymphs down to the fish quickly and keeping them there is paramount in freestone streams. Fish typically feed very close to the bottom.
- Split Shot: The most common and adjustable method. Carry a variety of sizes (BB, 3/0, 2/0, 1/0, B) in a small dispenser. You can add or remove shot as needed to match the current and depth. Place your shot 6-12 inches above your first nymph, ensuring it's not so heavy that it constantly snags the bottom but heavy enough to tick along.
- Tungsten Putty/Weight: This moldable weight can be added directly to your leader or even wrapped around the shank of a fly. It's great for fine-tuning weight without adding bulk or hard edges that can snag. It can be a little messier than split shot.
- Weighted Flies: Many nymphs are tied with tungsten beads, lead wraps, or heavy wire to sink quickly. Using weighted flies means less external weight on your leader, leading to a more natural drift and fewer snags. Often, your "point fly" (the one furthest down) will be a heavier, larger nymph, acting as an anchor for a smaller, unweighted or lightly weighted "dropper fly" tied above it.
Experiment with your weighting. The ideal is to have your flies just occasionally ticking the bottom without getting constantly snagged. This indicates you're in the fish's feeding zone.
Nymph Selection
The sheer variety of nymphs can be daunting, but for BC freestone streams, focus on patterns that imitate common aquatic insects and are proven fish-catchers. It's often more about size, weight, and presentation than the exact pattern.
Key Nymph Categories for BC Freestone Streams:
- Stonefly Nymphs: Large, bulky, and often heavily weighted, these are crucial, especially in winter and early spring, or after high water events when they get dislodged. Patterns like the Pat's Rubber Leg, 20 Incher Stone, and Kaufmann's Stone are fantastic in sizes #6-#12.
- Mayfly Nymphs: Your bread and butter. Baetis (Blue-Winged Olive), March Brown, Green Drake, and Pale Morning Dun nymphs are common. Patterns like the Pheasant Tail, Hare's Ear, Prince Nymph, and Copper John are essential in sizes #12-#18.
- Caddis Larvae/Pupae: Caddis are abundant in rocky freestone rivers. Green Rock Worms, Caddis Larva, and Sparkle Pupa imitations are great in sizes #10-#16.
- Attractor/Jig Nymphs: Sometimes, fish just want something flashy. Patterns like the Squirmy Wormy, Perdigon nymphs, and flashy hot-spot nymphs can trigger aggressive takes, especially on pressured fish or in off-colour water. Jig hooks are great for these as they ride hook-point up, reducing snags.
- Egg Patterns: Especially effective during salmon and steelhead spawning seasons when fish key in on loose eggs. Often used as an attractor in a two-nymph rig.
Carry a range of sizes and colours. Having a variety of nymphs, easily organized in a fly box (you can find many options on Amazon), will ensure you're ready for changing conditions. For some more specific patterns, check out our guide on Fly Patterns for BC Steelhead Rivers.
| Nymph Type | Common Patterns | Sizes | Best Use Cases |
|---|---|---|---|
| Stonefly | Pat's Rubber Leg, 20 Incher Stone | #6 – #12 | High water, cold water, larger fish, anchor fly |
| Mayfly | Pheasant Tail, Hare's Ear, Copper John | #12 – #18 | General nymphing, matching hatches, versatile |
| Caddis | Green Rock Worm, Sparkle Pupa | #10 – #16 | Abundant in rocky rivers, mid-column drift |
| Attractor | Squirmy Wormy, Perdigon, Hot Spot Nymph | #10 – #16 | Off-colour water, highly pressured fish, triggering strikes |
| Egg Patterns | Glo-Bug, Roe | #8 – #14 | During salmon/steelhead spawn, attractor in multi-nymph rigs |
Rigging Techniques for Different Freestone Conditions
While the components are key, how you assemble them into a "rig" is equally important. Different conditions in BC's freestone streams call for different approaches to get your nymphs where they need to be.
Single Nymph Rig
The single nymph rig is the simplest and often most stealthy setup. It's great for clear, low-water conditions, or when you want maximum accuracy in your cast and minimal tangles.
How to Rig It: Attach your chosen nymph directly to your tippet. If additional weight is needed, add split shot 6-12 inches above the fly. The length of your tippet from the indicator to the fly will vary, but a good starting point is 1.5 times the depth of the water you're fishing.
When to Use It:
- Clear, low water: A single fly and minimal rigging reduces disturbance and allows for a more natural presentation, crucial when fish are spooky.
- Targeting specific lies: If you know exactly where a fish is holding in a small pocket or seam, a single nymph is easier to cast precisely.
- Beginners: It's a great way to learn nymphing fundamentals without the added complexity of multiple flies.
- Match the hatch: When fish are focused on a very specific insect (e.g., a small Baetis hatch), a single, accurate imitation can be incredibly effective.
This rig allows for a cleaner drift and less chance of snagging multiple flies on the bottom. It's all about subtlety and precision.
Two Nymph Rig
The two-nymph rig is arguably the most popular and versatile setup for freestone streams. It allows you to present two different flies, perhaps at different depths or imitating different insects, increasing your chances of finding what the fish want.
How to Rig It:
- Tie your "point fly" (the heavier or larger nymph) to the end of your tippet.
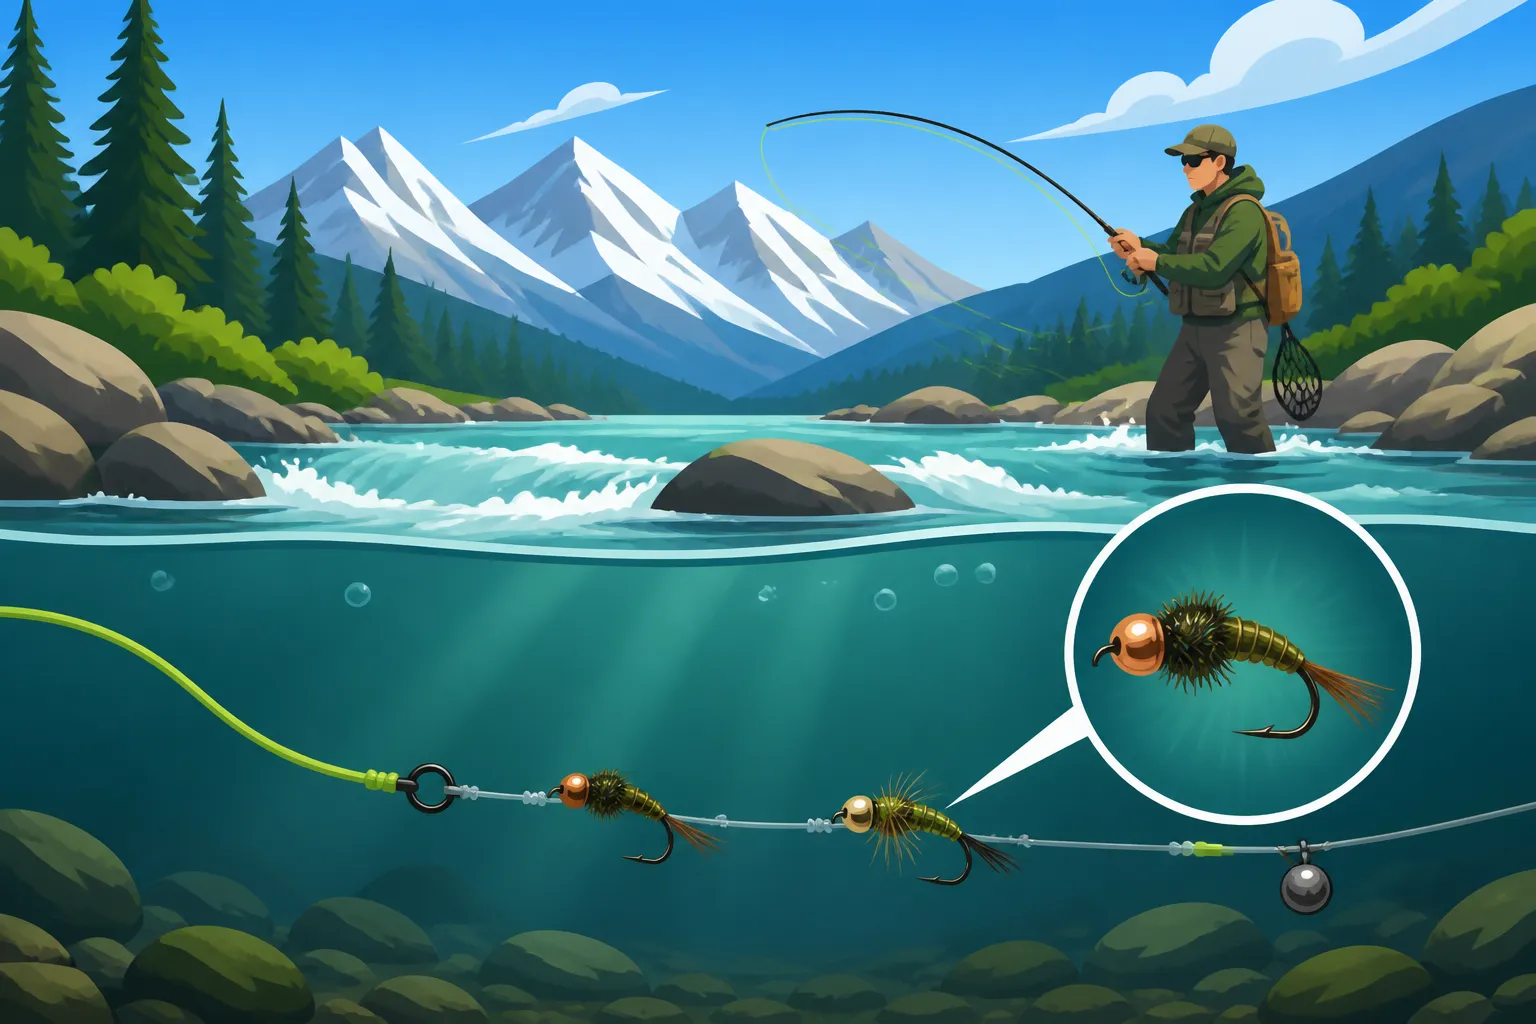
- From the bend of the hook of your point fly, tie a second piece of tippet (usually 12-18 inches long) to which you attach your "dropper fly" (often a smaller, unweighted or lightly weighted nymph). Alternatively, some anglers prefer to tie a short tag end of tippet from a surgeon's knot in their main leader for the dropper fly, then continue the main tippet down to the point fly. This can reduce tangles.
- Add split shot or putty 6-12 inches above the point fly, or strategically between the two flies if you want to vary their drift.
When to Use It:
- Searching unknown water: Offering two different patterns (e.g., a large stonefly and a small mayfly) helps you quickly figure out what the fish are keying on.
- Varying depth: The heavier point fly acts as an anchor, while the lighter dropper drifts slightly higher in the water column, covering more depth.
- Murky or fast water: The double offering increases visibility and appeal in challenging conditions.
- When specific insect hatches are unclear: It's a fantastic way to hedge your bets and present multiple options.
This rig covers more water and more potential feeding preferences, making it incredibly effective for targeting trout and steelhead. Remember to check local BC Bag and Possession Limits by Species and regulations for restrictions on the number of hooks allowed.
Dry-Dropper Rig
The dry-dropper rig is a hybrid approach, combining the visual appeal and strike indicator function of a dry fly with the subsurface effectiveness of a nymph. It's a blast to fish because you get the excitement of a surface strike, even if the fish takes the nymph below!
How to Rig It:
- Tie a buoyant dry fly (e.g., a Chubby Chernobyl, Stimulator, or a large foam hopper pattern) to the end of your tippet.
- From the bend of the hook of the dry fly, tie a piece of tippet (typically 18-36 inches long, depending on water depth) and attach your nymph. The dry fly acts as your indicator and helps suspend the nymph at the desired depth.
When to Use It:
- Mixed feeding activity: When fish are occasionally looking up for dries but still primarily feeding subsurface.
- Shallower runs and riffles: The dry fly provides enough buoyancy for lighter nymphs in shallower water without the need for additional weight.
- Clearer water: A dry fly can be less intrusive than a large plastic indicator in clear conditions.
- Structured pockets: Fishing tight pockets and eddies where a long indicator rig would be cumbersome to cast.
- Summer fishing: Often a go-to during the warmer months when larger terrestrial insects are active, and trout might take a dry.
This rig offers a fun and effective way to cover two layers of the water column simultaneously.
Euro Nymphing Rig
Euro Nymphing (also known as tight-line nymphing, French nymphing, Czech nymphing) is a specialized contact nymphing technique that has gained immense popularity for its extreme sensitivity and effectiveness in freestone rivers. It minimizes the amount of fly line on the water, allowing for direct contact with the flies and immediate strike detection.
How to Rig It:
- Specialized Rod: Often uses a longer, lighter rod (10-11 feet, 2-4 weight) for superior line control and sensitivity.
- Thin Monofilament Line: Instead of a traditional fly line, a very thin, level monofilament line (e.g., 20 lb Amnesia or specialized Euro Nymphing line) is often used as the main "fly line."
- Sighter: A multi-coloured, highly visible piece of monofilament (often 2-3 feet long) is tied into the leader, typically with tippet rings, to act as the primary strike indicator. This is where you watch for the slightest twitch or pause.
- Long Tippet Section: A long (6-10 feet) section of fine fluorocarbon tippet (3X-5X) extends from the sighter to your flies.
- Weighted Nymphs: You almost exclusively use heavily weighted, often jig-style, tungsten-bead nymphs. These sink quickly, and their weight keeps the line tight to maximize sensitivity. You'll typically fish two or three nymphs.
When to Use It:
- Fast, complex currents: The direct contact allows you to maintain control and detect strikes that would be missed with traditional indicator setups.
- Deep pockets and runs: Gets flies down quickly and efficiently.
- Educated or finicky fish: The stealth and precise presentation can fool even the wariest trout or steelhead.
- High wind conditions: Minimal line on the water means less wind interference.
While it has a learning curve, mastering Euro Nymphing BC Interior Streams can unlock incredible success on challenging freestone rivers.
Advanced Tips and Considerations for Nymphing Success
Beyond the basic rigging, there are nuances to nymphing that can significantly elevate your success rate on BC's freestone streams. It's about combining your gear with skilled technique and a deep understanding of the water.
Reading the Water
This is perhaps the single most important skill for a nymph angler. Freestone streams are a mosaic of currents, and fish hold in very specific places to conserve energy and ambush food.
- Seams: The transition zones where fast water meets slow water are prime holding lies. Fish will sit in the slower current, waiting for food to drift by in the faster lane. Look for bubbles or foam lines, as these often indicate a good seam.
- Eddies and Back-Currents: Swirling water behind large rocks, logs, or in bends of the river offers refuge from the main current. Fish will often hold in the slower water of an eddy, picking off food that gets pulled in.
- Pockets: Small, calmer areas of water behind or between large boulders. These are classic holding spots, especially for smaller trout. You need to drop your flies accurately into these small windows.
- Riffles and Runs: While turbulent, the broken water in riffles provides cover and oxygen. Fish will often sit in the "tail-outs" of riffles, where the current slows slightly, or in deeper slots within a run.
- Deep Pools: While sometimes featureless, deep pools can hold large fish, especially steelhead or bull trout. Nymphing these often requires heavier rigs and a patient, systematic approach.
Spend time observing the water before you cast. Learn to identify these features and predict where a fish might be holding. The better you read the water, the more efficient your fishing will be.
Casting and Presentation
Your cast for nymphing freestone streams is different from a delicate dry fly presentation. The goal is to get your weighted flies to sink quickly and drift naturally, without drag.
- Upstream Cast: Most nymphing is done by casting slightly upstream and across, allowing your flies to sink as they drift downstream towards you. This gives them time to get to the fish's depth.
- Slack-Line Casts: Techniques like the "reach cast" (extending your rod arm after the forward cast) or "parachute mend" (forming an S-curve in your line in the air) are invaluable. They introduce slack into your line before it hits the water, delaying drag and allowing a more natural, dead-drift.
- High-Sticking: Keeping as much of your fly line as possible off the water, often by holding your rod tip high, is crucial. This minimizes drag from conflicting currents. Your leader and indicator should be the only things touching the water.
- Mending: As your line drifts, different currents will pull on it, causing unnatural drag. Learn to mend – flipping an S-curve of line upstream or downstream – to correct the drift and keep your indicator and flies moving at the same speed as the current. Effective mending is key to avoiding drag, which is a fish-spooker. Check out our guide on Best technique for fishing a riffle for steelhead for more specific tactics.
Practice these casting and mending techniques, and you'll immediately see an improvement in your hook-up rates.
Detecting Strikes
Nymphing strikes can be incredibly subtle, especially in turbulent water. You're rarely going to see a violent yank.
- The Indicator: Watch your indicator like a hawk. Any hesitation, pause, dip, twitch, or sudden acceleration that isn't consistent with the current is a potential strike. Sometimes it's just a tiny shimmy.
- The Line: If you're Euro Nymphing or fishing without a traditional indicator, watch your sighter or the very end of your fly line for any unnatural movement.
- Feeling the Take: With tight-line nymphing, you'll often feel a subtle "tick" or "pressure" through the rod.
- Set the Hook: When in doubt, set the hook! A quick, firm lift of the rod tip is usually enough. It's better to set on a snag than to miss a fish.
Being attentive and developing a keen eye are essential skills that come with practice.
Fish Handling and Conservation
British Columbia's freestone streams are home to precious wild fish populations, including vulnerable steelhead runs. Practicing responsible fish handling is not just good etiquette; it's vital for the health of the fishery.
- Barbless Hooks: Always crimp your barbs. Barbless hooks make for easier, quicker release and significantly reduce harm to the fish. Many BC waters, especially those with sensitive populations like Interior Fraser steelhead, have mandatory barbless hook regulations.
- Minimize Fight Time: Use appropriate tackle (rod, reel, line) to land fish as quickly as possible without over-stressing them.
- Keep Fish in Water: Avoid removing fish from the water, especially larger ones or those you intend to release. Their gills can be damaged by air exposure, and handling them dry removes their protective slime layer.
- Wet Hands: Always wet your hands before touching a fish.
- Support Body Weight: If you must handle a fish for a quick photo, support its full body weight horizontally. Never hold a fish vertically by its jaw or tail.
- Revive Carefully: If a fish is lethargic, hold it gently in the current, facing upstream, until it swims away under its own power.
- Know the Regulations: Always consult the current Reading the BC Freshwater Fishing Regulations Synopsis before you go. Pay close attention to BC Catch and Release Only Waters, specific closures, and gear restrictions. Regulations can change frequently, often with in-season updates posted via fishery notices.
By following these practices, we ensure that these magnificent fish continue to thrive for future generations. Respecting the resource is just as important as the thrill of the catch.
Disclaimer
This article is for general informational purposes only and does not constitute professional advice. Laws, prices and regulations vary by location and change over time. Consult a qualified professional for guidance on your specific situation.